About the 7.2 Release
The LinkPoint Connect 7.2 Release builds on the enhanced Side Panel and redesigned UI to optimize user experience. The new LinkPoint Connections feature provides an innovative way to track contacts and leads missing in Salesforce based on Outlook email signatures. Refinements to SnapRecord for one-off event recording expand flexibility when working with Outlook meetings. New options for creating Outlook records using Salesforce data make it easy to maintain local and mobile content in Outlook/Exchange with minimal data entry. All 7.2 Release updates are designed to increase user productivity along with the quality of Salesforce interactions.
A Note About Software Upgrades
The 7.2 Release is available for LinkPoint Connect PC deployments.
Products and services provided by LinkPoint360 are automatically updated by default. Individual users may, in most cases, change their update preferences in LinkPoint Assist.
Some organizations may request that upgrades be disabled by default and then manually released at the discretion of internal IT teams. If you see new features or functionality listed in the release notes but do not see the new features in your instance of LinkPoint Connect, please contact your System Administrator.
Additionally, to preserve existing configuration for our clients, accounts running our application for Citrix/VDE set ups, those with prior custom deployments, and those for our Solutions integrations will not receive automatic upgrades. Note that the upgrades are available on the Enhanced Side Panel UI and not for Classic LinkPoint Connect users. If you would like to upgrade your users to the Enhanced Side Panel UI and/or the 7.2 Release, please contact your Account Executive or customersuccess@linkpoint360.com.
Create & Edit Records
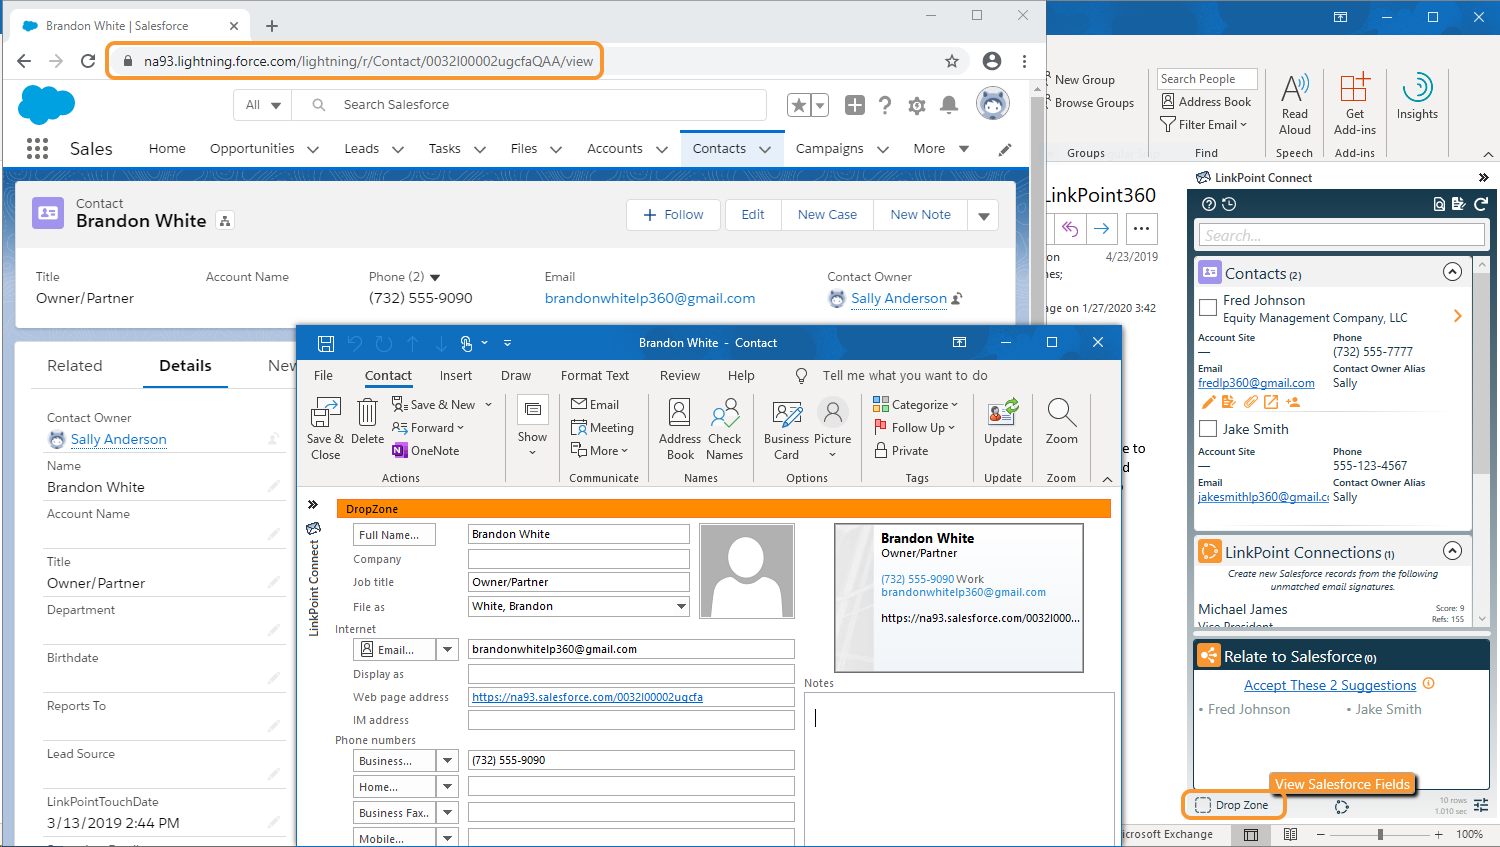
Create Outlook Contacts

New Functionality: Users can now create new Outlook Contacts from Salesforce data and information presented in the Side Panel.
Users can drag and drop email signatures to the Drop Zone to create an Outlook contact with prepopulated fields.
The Send to Outlook icon on the contact and lead records in the Side Panel launches the New Contact form in Outlook with prepopulated fields. The Salesforce Records URL is added to the Web page address field for further reference.
Users can also create Outlook contacts when reviewing records in LinkPoint Connections.

Additional Resources: Learn more in the Create Outlook Records & Create Records with LinkPoint Connections section of this User Guide.
Drag and Drop Salesforce URLs to Create Outlook Records
New Functionality: Users can create new Outlook records based on Salesforce information using existing Salesforce URLs.
Click and hold (do not select) a link in Salesforce in the web browser and drag it to the Drop Zone in the Side Panel. Release the left mouse button to launch an Outlook record prepopulated with Salesforce data to create a new task or contact record. LinkPoint Connect automatically detects the record type, such as contact or task, and opens the corresponding Outlook form. Note that this feature does not support creating Salesforce accounts in Outlook.
Additional Resources: Learn more in the Drag and Drop to Create Salesforce Records & Drag and Drop to Update Salesforce Records section of this User Guide.
LinkPoint Connections for Contact Management
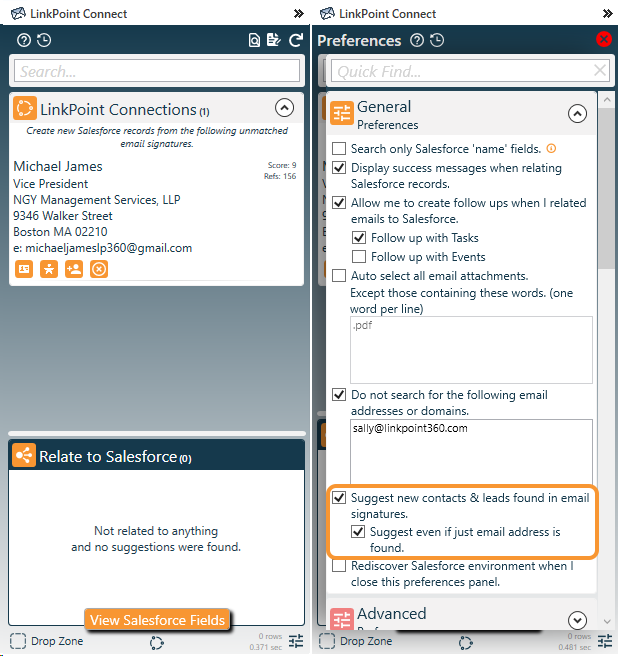
New Functionality: LinkPoint Connections aggregates all contacts and leads a user interacts with via email who do not already exist in Salesforce. Users can review these records and create a new Salesforce lead or contact or create an Outlook contact. LinkPoint Connections displays content based on email signatures found in the user’s emails and includes them in a ranked list based on the number of data points available and how often the user interacts with the individual.
Users can view unmatched contacts and leads related to a selected email by expanding the LinkPoint Connections section in the Side Panel. In this view, LinkPoint Connections will display information based on email addresses and signatures relevant only to the selected email. This contextual view will not appear as an option if there are no unmatched records on the email.
Users can view a complete history of all unmatched contacts and leads by clicking the LinkPoint Connections icon in the bottom of the Side Panel. Records are removed from LinkPoint Connections either by adding the record to Salesforce or selecting the option to disregard the item. LinkPoint Connections will dedupe information, keeping the
most recent or the most complete email signature for a single
email address record.
Configuration options are included in the General Preferences section of the Preferences Pane. Users can choose to enable/disable the feature with the option to “Suggest new contacts & leads found in email signatures.” The option to “Suggest even if just email address is found” allows users to fine tune search and recommendation settings.
Additional Resources: Learn more in the Create Records with LinkPoint Connections section of this User Guide.
Record Emails
Designate a Primary Contact on Recorded Emails
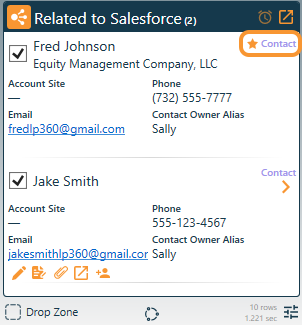
New Functionality: Users can now indicate a primary contact when recording emails to multiple contact records in the Side Panel. The first contact selected is automatically designated as the primary contact and is indicated with a solid orange star icon. Users can override the default designation and change the primary contact by selecting the outline star for other listed contacts in the Related to Salesforce list. The primary contact designation is only available on the main Side Panel and not the Record Details Pane.
Note that this feature is only supported for Salesforce orgs where the option to “Allow Users to Relate Multiple Contacts to Tasks and Events” is enabled. Primary contact designation allows users to choose the best Salesforce contact to align a recorded item with when selecting multiple records. This enhances reporting metrics and ensures that data is allocated with accuracy for orgs with the “relate multiple contacts” setting enabled. Follow up tasks and events created from recorded emails automatically associate to the selected primary contact.
Additional Resources: Learn more in the Record an Email to Salesforce section of this User Guide.
Edit Email Subject and Body When Recording Emails

New Functionality: Users can now edit the subject and body of an email when recording an outbound email from Outlook.
Users draft the email and relate to Salesforce as needed. Then, click the View Salesforce Fields button at the bottom of the Side Panel to access the subject and body/comments fields that map to Salesforce.
Note that changes are not applied in Salesforce until the item is sent. Email recipients will not see the edits to the email. The task fields in Salesforce will be updated with the edited content. The task comments will reflect the original subject and body from the email. If recording emails using Salesforce Enhanced Email, edit changes will only be reflected in the plain text version of the email in Salesforce. The HTML version of the email will not be altered in Salesforce.
Additional Resources: Learn more in the Edit Recorded Emails section of this User Guide.
Launch Recorded Emails in Edit Mode
Previous Functionality: Users could record emails to Salesforce but could not access shortcuts to edit the recorded email content in Salesforce from the Side Panel.
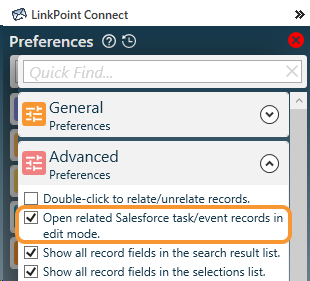
Enhanced Functionality: Users can configure the Open in Salesforce shortcut to launch the recorded email record in Salesforce in edit mode. This option is disabled by default.
Users can enable the option to “Open the related Salesforce Task/Event records in Edit mode” in the Advanced Preferences section of the Preferences Pane. This option makes it easier for users to adjust email body and subject content in Salesforce once items are recorded.
Additional Resources: Learn more in the Edit Recorded Emails & Record an Email to Salesforce section of this User Guide.
Record Email as an Attachment
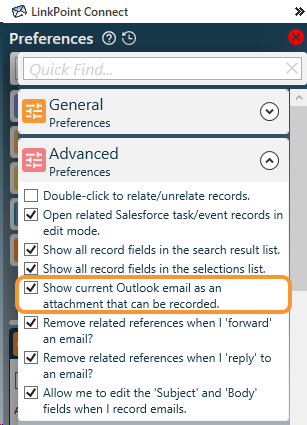
New Functionality: Users can now choose to record emails as attachments in Salesforce rather than as completed tasks in the record Activity History. This option is disabled by default.
Users can enable the option to “Show the current Outlook email as an attachment that can be recorded” in the Advanced Preferences section of the Preferences Pane. Users can select the email in the Attachment section of the Side Panel to record it as an attachment to the selected records in the Related to Salesforce list.
Note that if the HTML and plain text versions of the email exceed the size limits in place in Salesforce, LinkPoint Connect will record the email as truncated plain text only. If only the HTML version exceeds the size limit in Salesforce, the message content will be recorded as plain text only.
Additional Resources: Learn more in the Record an Attachment to Salesforce & Edit Preferences section of this User Guide.
Record Emails to the Salesforce Enhanced Email Object
New Functionality: Organizations with the Salesforce Enhanced Email Object can now record emails to this object rather than as completed tasks in the record Activity History. This feature is off by default and can be enabled on request by LinkPoint360 Professional Services.
Additional Resources: Learn more in the Record an Email to Salesforce section of this User Guide.
Remove Related References Options
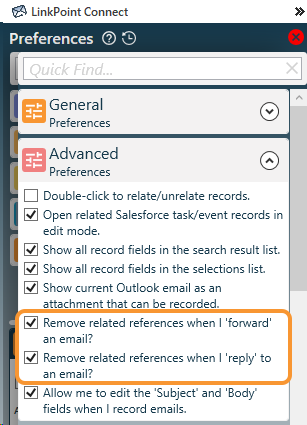
Previous Functionality: Users could record an inbound email to Salesforce records as needed. However, when forwarding or replying to the same email, the user needed to select Salesforce records again to associate the outbound item. The outbound email did not inherit the related selections from the inbound instance of the email.
Enhanced Functionality: Users can configure settings in the Advanced Preferences section of the Preferences Pane to force outbound emails to inherit the related to selections of previously recorded inbound emails. Separate settings are available for forwarded emails and replies.
The settings are labeled as “Remove related references when I ‘forward’ an email?” and “Remove related references when I ‘reply’ to an email?”. These options are enabled by default. Users can change the inherited related to selections prior to sending and recording the email to Salesforce.
Additional Resources: Learn more in the Edit Preferences section of this User Guide.
Search History Retention
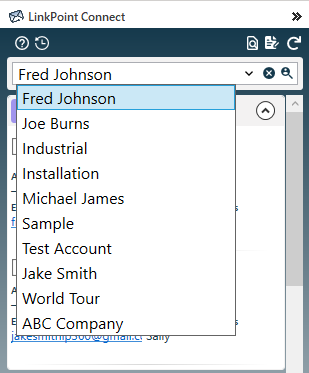
Enhanced Functionality: The Side Panel Search Bar will retain the last 10 terms entered for faster search access. Users can click the v icon in the Search Bar to select a previous search term.
On most versions of Outlook, users can also call up the search history list by clicking in the Search Bar and then using the ctrl and down arrow keys on the keyboard simultaneously.
Additional Resources: Learn more in the Edit Preferences section of this User Guide.
Work with Salesforce Email Templates in Outlook
New Functionality: Users can now access Salesforce email templates in Outlook to streamline outbound communication.
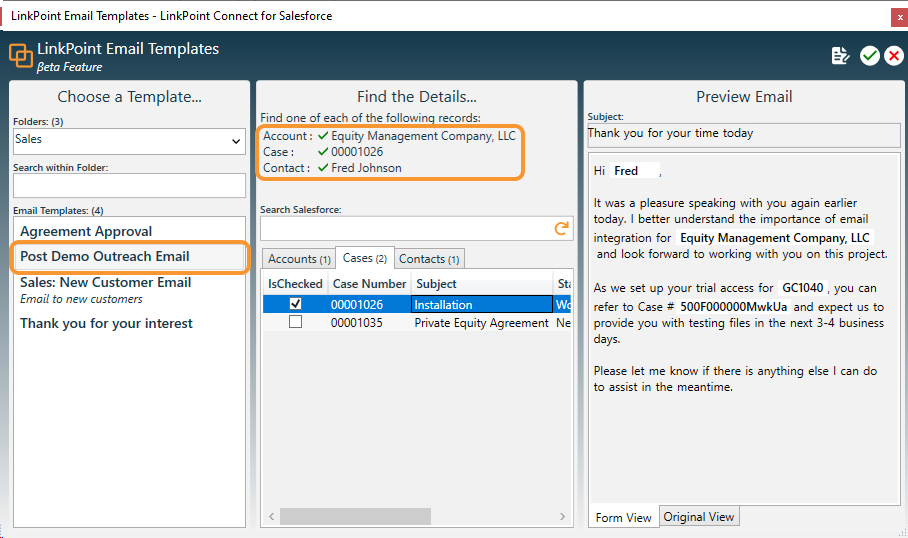
Users can select a template based on their Salesforce permissions and folder access. Then, choose Salesforce records depending on the template needs for merge fields in Outlook. Recommendations are made based on the email addresses on the email. Users can preview the template to see how merged data will display and make edits before adding content to the email. The option to create a new record via SnapForms is also available in the window.
Additional Resources: Learn more in the Use Salesforce Email Templates in Outlook section of this User Guide.
Meeting Recap
Launch a Meeting Recap from the Side Panel
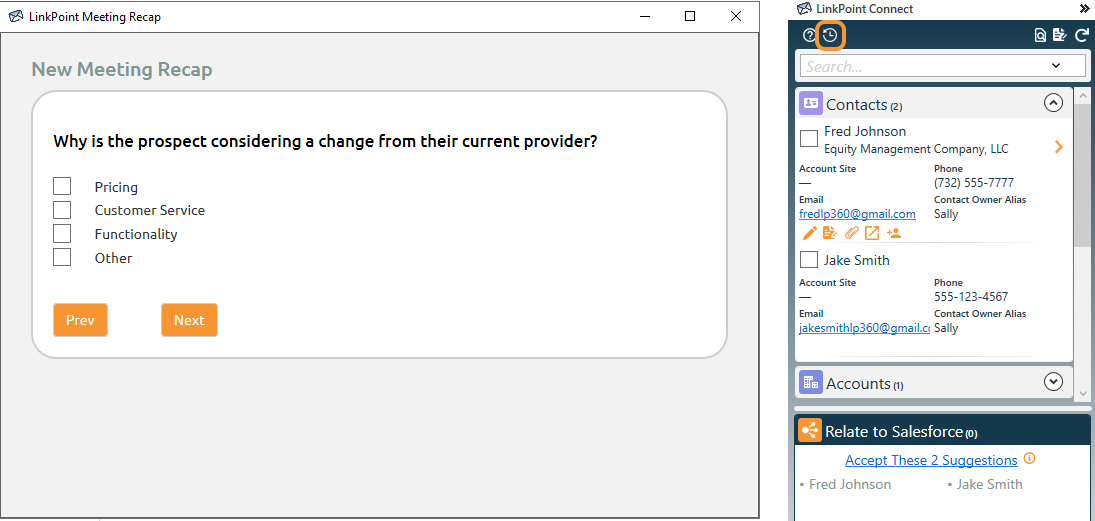
New Functionality: Users can now access the Meeting Recap feature from the Enhanced Side Panel.
Meeting Recap allows users to enter meeting notes and update additional Salesforce fields relating to specific records including Opportunities for better account insights.
Users can click the Meeting Recap icon to launch the process and may be prompted to log into their account to proceed. Users are guided through a feedback process with preset question and answer sets for consistent data tied to key metrics. Changes are written to the related Salesforce objects and fields once the meeting recap is completed.
Additional Resources: Learn more about Meeting Recap and associated articles.
SnapForms
Relating Cases to Accounts with SnapForms

Previous Functionality: Users could create Cases for specific records via the Side Panel but were required to populate the reference to Accounts manually.
Enhanced Functionality: LinkPoint Connect automatically populates the Account in the Case SnapForm based on Account information inferred from the selected record. This functionality does not overrule any existing Salesforce permissions for viewing or editing Case or Account data.
Additional Resources: Learn more in the Create Salesforce Records with SnapForms & Edit Salesforce Records with SnapForms section of this User Guide.
SnapRecord
Populate Meeting Invitees/Attendees on Events SnapRecorded to Salesforce
New Functionality: LinkPoint Connect supports populating meeting invitees when using SnapRecord to add Outlook meetings to Salesforce. This feature is off by default and can be enabled upon request.
When a meeting is added to Salesforce, the event will include a listing of everyone invited on the meeting invite. Note that invitee responses to the meeting will not be updated in Salesforce when using SnapRecord.
Additional Resources: Learn more in the Record Events with SnapRecord section of this User Guide.
SnapRecord Attachments on Calendar Events in Outlook
New Functionality: Users can select attachments on Outlook calendar events to record them to Salesforce when using SnapRecord. SnapRecord allows users to one-off add events to Salesforce without enabling a full Calendar Sync.
Additional Resources: Learn more in the Record Events with SnapRecord section of this User Guide.
SnapRecord and Canceled Meetings
Previous Functionality: Canceled or deleted Outlook meetings and appointments were not removed from Salesforce since SnapRecord functions as a one-time, one-way recording of an event from Outlook to Salesforce.
Enhanced Functionality: Meetings added to Salesforce using SnapRecord will be removed from Salesforce if they are deleted or canceled in Outlook. SnapRecord continues to serve as a one-time, one-way method to record individual events to Salesforce. Note that cancellations are updated for all users who SnapRecord events, regardless of sender/recipient relationship.
Additional Resources: Learn more in the Record Events with SnapRecord section of this User Guide.
SnapRecord and Recurring Meetings
New Functionality: SnapRecord functionality for recurring meetings has been redesigned to include more compatible support for meetings managed in Outlook. Users cannot SnapRecord an entire recurring meeting series at once. However, users can open a single occurrence of a recurring meeting and choose to SnapRecord the item to Salesforce. The CRM Category will only appear on each single instance of a recurring meeting that the user acts on.
Additional Resources: Learn more in the Record Events with SnapRecord section of this User Guide.
Tracker
Email Tracking Enhancements
Enhanced Functionality: LinkPoint Tracker now presents tracked email data in the Side Panel based on read or unread status. Users can view tracked email details conditionally based on selected leads or contacts. The Tracker Window (accessible via LinkPoint Assist) is also enhanced with more robust filtering.
Additional Resources: Learn more in the Track Email Opens & Configure LinkPoint Tracker section of this User Guide.
User Interface (UI) Updates
Salesforce Fields UI Update
Previous Functionality: Salesforce Fields were updated directly inside the bottom of the Side Panel when working with applicable emails, calendars, or tasks.
Enhanced Functionality: Salesforce Fields are now easier to edit in SnapForms layouts. Users click the View Salesforce Fields button in the bottom of the Side Panel and are presented with a full window for entering and updating Salesforce data.
All Salesforce validation rules continue to apply, but errors are now displayed clearly in the provided window. Salesforce Field data is not written until the item is recorded to or synced to Salesforce.
If a user enters Salesforce Field values before selecting records to relate the item to, the system will prompt the user to make at least one selection.
Additional Resources: Learn more in the View Salesforce Data in Outlook section of this User Guide.
Updated Side Panel Icons
Enhanced Functionality: Icons have been updated and consolidated throughout the Side Panel to refine the user experience. The new Help icon ![]()
![]()
![]()
![]()
Additional Resources: Learn more in the View Salesforce Data in Outlook section of this User Guide.
